

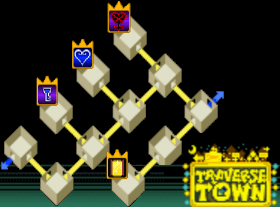
Floor 01: Traverse Town
After the opening video, Sora and friends find themselves in a strange castle. A mysterious hooded figure appears, and basically explains the rules of the game to them.
 |
Cards | |
| Attack Card | Kingdom Key | |
| Calm Bounty | None | |
| Hidden Room | Lionheart (Attack) | |
| Doors | ||
| Key of Beginnings | 1+, Key of Beginnings | |
| Key of Guidance | 3+, Key of Guidance | |
| Key to Truth | Green, Key to Truth | |
| Key to Rewards | Key to Rewards | |
You really shouldn't have any trouble in Traverse Town, though I do suggest going through all of the normal rooms first, then visiting the Key of Beginnings room, and then going back through all the normal rooms, and then visition the Key of Guidance room, and so on, just to stock up on Map cards and hopefully some Attack cards as well. Remember, try jumping and/or hitting everything you come across.
Boss: Guard Armor
Location: Traverse Town, Key to Truth room
A nice and easy boss fight to start out with. Concentrate on one piece of armour at a time, and you'll soon whittle it down into nothing.
Trinity: (Random) Falls to pieces
Win: Guard Armor card
After leaving Traverse Town, Sora meets the mysterious figure again inside Castle Oblivion. Whilst talking, however, another man, Axel interrupts!
Boss: Axel I
Location: Castle Oblivion, Floor 01
Dodge Roll through his Fire Wall sleight, or keep 0 cards handy to break his slights. He uses his cards up quickly, so he'll need to reload his deck often, giving you valuable uncontested attacking time.
Win: Fire card
Defeating Axel gets us the first set of World cards; Agrabah, Halloween Town, Monstro, Olympus Coliseum, and Wonderland.
Floor 02: Agrabah
While you're given a selection of five different World Cards, I recommend using them in the order this walkthrough follows. The choice is up to you, but I like to get Omnislash as soon as possible, though I need just a bit more beefing up before taking on Hades.
 |
Cards | |
| Attack Card | Three Wishes | |
| Calm Bounty | Gravity (Magic) | |
| Hidden Room | Blazing Donald (Sleight) | |
| Doors | ||
| Key of Beginnings | Green, Key of Beginnings | |
| Key of Guidance | 15, Key of Guidance | |
| Key to Truth | Red, Key to Truth | |
| Key to Rewards | Blue, Key to Rewards | |
The main thing to watch out for in Agrabah, are the Fat Bandits. The easiest method to defeat them is to Dodge Roll through them and chain attacks into their unprotected back. However, so long as it's not an Attack card (Keyblade), any other form of attack will work, e.g. Fire, Cross-Slash, Goofy Charge, etc. Also, Barrels are great fun; they often have a good amount of HP or Moogle Points in them, or you get to duke it out with Barrel Spiders which is always amusing.
Boss: Jafar
Location: Agrabah, Key to Truth room
Ignore Jafar and aim for Iago carrying lamp. You can only reach him from a platform that's at the maximum height. When you can't reach him, stick to either the middle platform or the lowest one if Jafar is on the opposite side. Whilst the fight will take a while, it shouldn't be particularly difficult.
Win: Jafar card
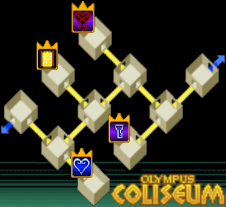
Floor 03: Olympus Coliseum
 |
Cards | |
| Attack Card | Olympia | |
| Calm Bounty | Blizzard Raid (Sleight) | |
| Hidden Room | Metal Chocobo (Attack) | |
| Doors | ||
| Key of Beginnings | 5+, 7+, Key of Beginnings | |
| Key of Guidance | Green, Key of Guidance | |
| Key to Truth | 3-, Key to Truth | |
| Key to Rewards | 0 Red, Key to Rewards | |
Aside from the cards from defeating the bosses, there's not much to say about the Olympus Coliseum.
Boss: Cloud
Location: Olympus Coliseum, Key of Guidance room
This is basically a simple brawl. Dodge-roll towards where Cloud's coming from to avoid each stroke of his Omni-Slash sleight, or preferably, just break it.
Win: Hi-Potion card
Boss: Hades
Location: Olympus Coliseum, Key to Truth room
This fight is also fairly simple, though it can be quite punishing. Try to break Temper Flare sleights if you can, since it enables Hades to use stronger attacks against you. Keeping just out of his melee range and performing hit-and-run strikes is the best tactic.
Win: Hades card
Ah, sweet, sweet Cloud card, how I love thee so. You want to stock at least five of these beauties as fast as you can, for unleashing Omnislash and Cross-Slash sleights to make all common fights a walk in the park, drastically decreasing the difficulty of this game.
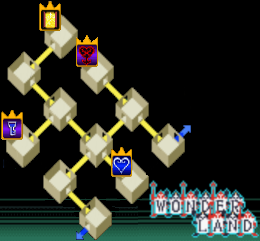
Floor 04: Wonderland
 |
Cards | |
| Attack Card | Lady Luck | |
| Calm Bounty | Stop (Magic) | |
| Hidden Room | Stop Raid (Sleight) | |
| Doors | ||
| Key of Beginnings | 8+, Key of Beginnings | |
| Key of Guidance | 1+, Key of Guidance | |
| Key to Truth | Red, Green, Key to Truth | |
| Key to Rewards | 9 Red, 9 Green, Key to Rewards | |
The easiest of the first set of World Cards, a lot of people save this one for last so there's no difficulty in progressing, but I like to save Monstro and Halloween Town for last, so I can get better levelling in them using Teeming Darkness Map cards.
Boss: Card Soldiers
Location: Wonderland, Key of Guidance room
Not strictly a boss fight, but it's not an ordinary battle either really. Use the Omni-Slash sleight to take them out in groups.
Win: Card Soldier card
Boss: Trickmaster
Location: Wonderland, Key to Truth room
Aim for the torso by using jumping attacks. The Omni-Slash sleight is awesome here, though it should be noted Cross-Slash will miss with the second and third hits. The Blitz sleight is also pretty useful here if you have it.
Trinity: (Hit while charging up) Table appears in middle of room. Disappears when Trickmaster does Slam move.
Win: Trickmaster card
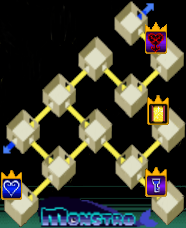
Floor 05: Monstro
 |
Cards | |
| Attack Card | Wishing Star | |
| Calm Bounty | Fire Raid (Sleight) | |
| Hidden Room | Aqua Splash (Sleight) | |
| Doors | ||
| Key of Beginnings | 20, Key of Beginnings | |
| Key of Guidance | 0, Key of Guidance | |
| Key to Truth | Red, 5-, Key to Truth | |
| Key to Rewards | 15 Green, Key to Rewards | |
Monstro is good for levelling, and not much else. I'd only stick around if I really wanted to make Sora stronger, or else I'd jsut plough through Monstro as fast as possible.
Boss: Parasite Cage
Location: Monstro, Key of Guidance room
This is an irritating fight. Thankfully, it's not too long though. Not like the next two world bosses...
Take your time in attacking, always making sure to have a platform beneath you. Summons work excellently here since they remove Sora from the danger of the stomach acid coating the arena floor.
Trinity: (Hit whilst mouth yawns) Allows Sora to walk on/in the stomach acid.
Win: Parasite Cage card
Boss: Infinte Shadows
Location: Monstro, Key to Truth room
Ugh. This isn't really a boss, and as the name I gave it suggests, there is an unlimited number of Shadows that are coming after you. To win the battle, you need to kill as many Shadows as you can in as short a span of time as possible. A meter in the top-right corner will build up the better you do, but it'll go down if you start to take too long. Your best bet is to run away from the Shadows at first, and get them in a clump chasing you, so when you chain one, you chain all of them.
Win: Dumbo card
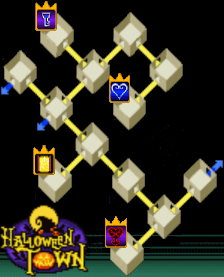
Floor 06: Halloween Town
 |
Cards | |
| Attack Card | Pumpkin Head | |
| Calm Bounty | Gifted Miracle (Sleight) | |
| Hidden Room | Gravity Raid (Sleight) | |
| Doors | ||
| Key of Beginnings | 3, 4, Key of Beginnings | |
| Key of Guidance | 6, 7, Key of Guidance | |
| Key to Truth | 3- Red, 30 Green, Key to Truth | |
| Key to Rewards | 20 Red, Key to Rewards | |
This level is pretty damn easy, none of the enemies here are especially difficult to beat, though Gargoyles can be annoying every now and then. Also, the Wight Knight Enemy card adds height to your jumps, which can be useful in some boss fights, so it's worth putting extra effort into getting one.
Boss: Oogie Boogie
Location: Halloween Town, Key to Truth room
In theory, this is quite an easy fight so long as you're prepared. Basically, make every card in your deck 8, 9 or 0, and you'll cream Oogie. So, how do you hit him? You need to Card Break Oogie's dice rolls, which are ALWAYS a value of 7. Three breaks lowers the fence, and you can jump up to Oogie's platform and wail on him. Wash, rinse and repeat.
Trinity: (On random die destruction) Lowers gates instantly
Save in the Moment's Reprieve at the end of the level before exiting Halloween Town.
Boss: Larxene I
Location: Castle Oblivion, Floor 06
While Larxene is very fast, she's also very weak. Stock a fair few 0 cards to break her items and her Lightning Bolt sleight, and she'll be pretty easy to beat. Stand at about middle-range so her base attacks can't quite reach you, but so that you're close enough to launch inwards with a chain open breaking her.
Win: Thunder card
Defeating Larxene nets Sora the second set of World cards; Atlantica, Hollow Bastion, Hundred Acre Wood, and Neverland.
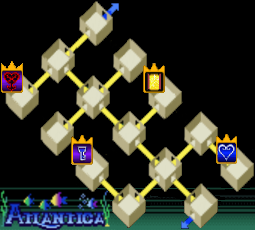
Floor 07: Atlantica
 |
Cards | |
| Attack Card | Crabclaw | |
| Calm Bounty | Shock Impact (Sleight) | |
| Homing Blizzara (Sleight) | ||
| Hidden Room | Quake (Sleight) | |
| Doors | ||
| Key of Beginnings | Red, Key of Beginnings | |
| Key of Guidance | Green, Key of Guidance | |
| Key to Truth | Blue, Key to Truth | |
| Key to Rewards | 30, Key to Rewards | |
Just a few notes to make for this world. Take out all of your Lightning cards from your deck, since a lot of enemies in Atlantica will just absorb it. Also, Ariel will only join in the Key of Guidance room. Aside from that, there's not much point in sticking around in Atlantica.
Boss: Ursula
Location: Atlantica, Key to Truth room
The easiest boss of the second set of World cards. Simply enough, just beat up a tentacle 'til it's lowered, and then jump-attack Ursula's head to do damage. Her only two attacks that are worrisome are the bubbles (which can confuse Sora - that is, controls are reversed) and her lightning breath, both of which can be dodge-rolled.
Trinity: (Random on tentacle knockdown) Lowers Ursula to enable easy hits.
Win: Ursula card
Boss: Riku I
Location: Castle Oblivion, Floor 07
This is a ridiculously easy fight. While he's faster than you, just keep chasing him down, and pummelling him while he reloads his deck.
Win: Aero card
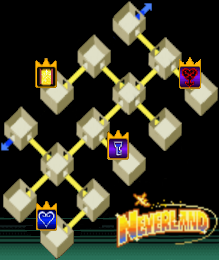
Floor 08: Never Land
 |
Cards | |
| Attack Card | Fairy Harp | |
| Calm Bounty | Teleport (Sleight) | |
| Homing Fira (Sleight) | ||
| Hidden Room | Thunder Raid (Sleight) | |
| Doors | ||
| Key of Beginnings | 5, Key of Beginnings | |
| Key of Guidance | 6, Key of Guidance | |
| Key to Truth | 30, Key to Truth | |
| Key to Rewards | 15 Blue, Key to Rewards | |
This is probably the best level in the game for pumping up Sora's strength, since almost every fight will come with a hoard of Heartless to defeat. Secondly, Peter Pan only joins between the Key of Beginnings and Guidance rooms, though he rejoins for the boss fight, making that span the best point to level up. Also, Air Pirate Enemy cards prevent your Item cards from being broken for three reloads, making it utterly awesome, allowing you to drastically lower your deck's CP since you can take 1's instead of having to either stock high value Item cards or using them in Sleights to stop them from being broken.
Boss: Hook
Location: Never Land, Key to Truth room
Either Hook or Maleficent is the hardest Disney boss by a long shot. Card Break his Rush & Present and Combo & Present sleights. You really don't want to be on the business end of them. Use Parasite Cage's Dispel to break his Second Chance, or you'll almost certainly come to regret it. Jafar's Attack Bracer is a nice idea too.
Try to stick to the high-end of the deck, since it'll make evading Hook's attacks that much easier. Keep at a distance from Hook, and he'll throw bombs at you; as soon as he throws it, charge into him and let loose a combo, and then retreat, all the while avoiding the bomb as it bounces around.
Win: Hook card
Boss: Riku II
Location: Castle Oblivion, Floor 08
The only major difference between this and the last Riku fight is that he now has his Dark Firaga sleight. Dodge-roll, card break or run around it, and it's completely negated. Wipe the floor with him.
Win: Warpinator sleight
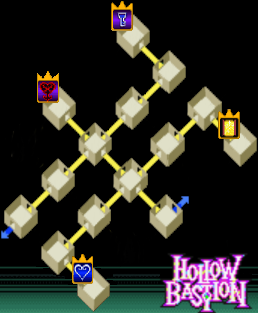
Floor 09: Hollow Bastion
 |
Cards | |
| Attack Card | Divine Rose | |
| Calm Bounty | Cross-Slash+ (Sleight) | |
| Reflect Raid (Sleight) | ||
| Hidden Room | Mushu (Summon) | |
| Doors | ||
| Key of Beginnings | Red, Key of Beginnings | |
| Key of Guidance | 9, Key of Guidance | |
| Key to Truth | 1, Key to Truth | |
| Key to Rewards | 2 Blue, Key to Rewards | |
The Wyvern Enemy card allows for three free reloads (the counter isn't increased), which is pretty neat and useful in boss battles, so it's well worth snatching one of. You'll also re-meet most of these enemies in the final level, so you'll get another chance to snatch it then. Defenders are basically the same as Fat Bandits and Large Body's, though they also have a ranged attack which can catch you off-guard if you're not expecting it, so beware.
Boss: Maleficient
Location: Hollow Bastion, Key to Truth room
This is a pretty nasty fight. Her head is the only weak point, so you'll mostly have to jump-attack her. However, card breaking her will cause her to lower her head, allowing you to throw in a chain. While Goofy and Beast can't actually hit Maleficent, they can eliminate the flames, which might result in a Trinity card appearing. Jafar and Wight Knight cards are pretty useful to use in this battle as well.
Avoiding her attacks is very important. With Jafar's Attack Bracer, you can pummel her to deny her the ability to use her Bite and Claw attacks. However, her Stomp attack can't be stopped, so watch carefully; when she raises a paw, jump into the air to avoid taking damage. Her final attack is breathing out more of the Flames that slowly move towards you.
Trinity: (Random on Flame Snuff) Creates Stair Block three levels high. Each Stomp lowers it by one.
Win: Maleficent card
Floor 10: Hundred Acre Wood
This section is infuriating, but can net you some sweet rewards.
First, call Pooh over to Rabbit's vegetable cart. Your position is very important, since you need to make him climb up onto the cart itself. Once he does, jump onto it as well, and the wheel will fall off.
Head down the level to Piglet, and get Pooh to talk to him. You'll learn the Confuse sleight by doing this.
Further down you'll find several balloons; call Pooh over to the largest bundle, and when he grabs it, he'll be lifted into the air. After the short cutscene, you'll get a Spellbinder attack card.
Our fourth stop is a hole with footprints leading into it; make Pooh fall down it and you'll get an Elixir card.
By this time, you'll probably need to feed Pooh a jar of honey to keep him going. Once he's satisfied, talk to Eeyore, and then continue downwards until you reach four tree stumps. Jump onto one and then call Pooh; if you manage to make him jump from stump-to-stump going counterclockwise, you'll get the Idyll Romp sleight.
Next, lead Pooh downwards and to the beehive; where afer he has a little trouble, you'll get the Bind sleight.
Moving further down, smash every pillar you find down into the ground. As you move past the second batch, provided you broke Rabbit's cart, several cabbages will start rolling down the hill towards you. Hit fourteen of them with your Keyblade to learn the Synchro sleight.
Finally, lead Pooh to the large tree stump at the end of the level, and you'll get the Bambi summon card.
When you're given the option, save. Trust me, you REALLY want to.
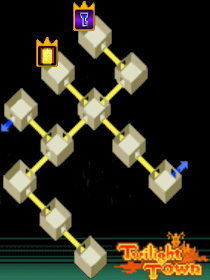
Floor 11: Twilight Town
Boss: Vexen I
Location: Castle Oblivion, Floor 11
Vexen is very slow, so he's not much of a threat to you. However, his shield prevents you from physically attacking his front, so if you want to melee, you need to Dodge-Roll behind him and quickly attack. Fire sleights work very well against him. His only worrying attack is the Freeze sleight; Dodge-Roll to avoid having your feet encased in ice, preventing you from moving. If you do get caught, mash on the jump button to break free.
Win: Mega-Ether card
 |
Cards | |
| Attack Card | None | |
| Calm Bounty | Firaga Break (Sleight) | |
| One-Winged Angel (Attack) [Post Marluxia I fight] |
||
| Hidden Room | Warp (Sleight) | |
| Doors | ||
| Key of Beginnings | 5+, 5-, Blue, Key of Beginnings | |
| Key of Guidance | None | |
| Key to Truth | None | |
| Key to Rewards | 8 Blue, 1 Red, 20 Green, Key to Rewards | |
Twilight Town is quite an odd one; smaller than all but the second floor, and only having one room with a story key required. There are also no difficult enemies (aside from the bosses) and finally, it didn't feature in the first Kingdom Hearts game! There's no real reason to bother exploring the level, so head straight for the Key of Beginnings room to have a rematch with...
Boss: Vexen II
Location: Twilight Town, Key of Beginnings room
Vexen adds three more sleights to his repertoire for this battle; Iceburn, which can be pretty much ignored, Ice Needles, which can be outrun, and Diamond Dust, which you really should break if you can.
He also has his enemy card in effect, which gives him half a bar of health once he hits 0, an incredibly annoying ability, so break it with Parasite Cage's Dispel.
Other than that, this is exactly the same fight as the first encounter.
Win: Vexen card
Boss: Riku III
Location: Castle Oblivion, Floor 11
A bit more HP, a bit more aggressive, a bit stronger, but not really any more dangerous. Just fight him like you have the previous two times.
Win: Mega-Potion card
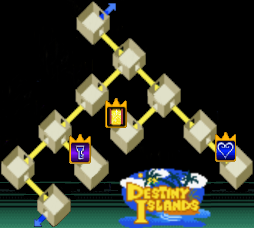
Floor 12: Destiny Islands
 |
Cards | |
| Attack Card | None | |
| Calm Bounty | Judgment (Sleight) | |
| Hidden Room | Megalixir (Item) | |
| Doors | ||
| Key of Beginnings | 2, 8, Key of Beginnings | |
| Key of Guidance | 50, Key of Guidance | |
| Key to Truth | None | |
| Key to Rewards | 33 Blue, 33 Green, 33 Red, Key to Rewards | |
The first thing to notice in Destiny Islands is that you won't get any Friend cards in battle, though by this point, you should't really need them anyway. Also, if you have a Key to Rewards card, this is the level to use it, since the Megalixir is seven shades of awesome.
Boss: Darkside
Location: Destiny Islands, Key of Guidance room
Darkside always attacks in the same pattern, making this fight a lot easier than it might initially seem. First, it'll smash its fist into the ground, creating a mini-shockwave, so avoid that, and then dash in to pummel it's arm. Then Darkside will lower its face and fire a ball of light from where its heart should be; dodge it and then hit its lowered face a few times.
Its third attack is to smash the ground with its fist again, but this time it splashes, forming two Shadow enemies which can't move beyond Darkside's pool. Take advantage to pummel it some more. The fourth and final attack is signalled by Darkside firing the ball of light into the sky, where it'll rain down beams at you. The lower its HP, the more beams it'll fire in total, but they only ever come one at a time, so as long as you can dodge them, you'll be fine. Once this attack ends, Darkside will repeat the pattern from scratch.
The Wight Knight card is very useful in this battle, since it increases your jumping height; attacking Darkside's arm does less damage than hits to its head will.
Trinity: (Random on Smash Flotsam) Floating platform lifts you to Darkside's head.
Win: Darkside card
While this level is pretty easy, including the boss, so it wouldn't be too hard to just redo it all, I'd still recommend saving before leaving Destiny Islands, since next we have our final battle with...
Boss: Riku IV
Location: Castle Oblivion, Floor 112
Don't be fooled, this battle is insanely hard, nothing at all like the first three encounters. With his new Dark Aura sleight (which must be broken at all costs, or you're screwed), not to mention more than a few Elixirs, a far stronger deck and the Shadow's Incrementor ability, Riku is a whole new animal.
Start by using Parasite Cage's Dispel to eliminate Riku's Incrementor; he'll Card Break you often enough even with it gone. This also serves a double purpose; with Incrementor gone, Riku will use Dark Aura less often, a huge bonus.
Omnislash and Judgment are both incredibly useful in this fight, since Riku will be constantly on the move. Armed with several 0 cards as well as Cure and/or Tinkerbell cards, break Dark Aura every time as well as his items, unleash homing sleights while he tries to recharge, and heal whenever possible.
Win: Riku card
At this point, I recommend going back into the Destiny Islands level and saving, before returning to the fallen Riku, and talking to him, since yet another boss battle is coming right up!
Boss: Larxene II
Location: Castle Oblivion, Floor 12
Larxene is a lot faster than in the first battle, which makes her hard to handle in this rematch. However, she's weak to special attacks, which is most definitely her undoing. Holy will beat the crap out of her, and sleights like Judgment and Ars Arcanum whilst she's reloading her deck will pile on the damage.
Start off by using the Hook card, to reduce the power of her thunder spells, and then try to keep to mid-range to avoid most of her attacks, enabling you to sneak in healing or reloads without getting caught. She rushes through her cards at a hellacious pace, so if you can break them, she'll quickly start to run out of cards in general, making the battle a lot easier.
Always be ready with a 0 card to break her Teleport Rush sleight, since it is by far her most dangerous attack; it's very hard to stop, so as soon as you see the name pop up in the corner, ready the card and use it as soon as she initiates the sleight.
Win: Larxene card
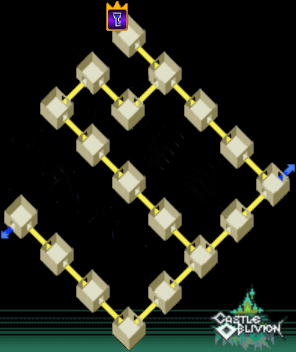
Floor 13: Castle Oblivion
 |
Cards | |
| Attack Card | None | |
| Calm Bounty | Ultima Weapon (Attack) [Defeat Marluxia I and save, Beat Reverse Rebirth] |
|
| Ansem (Enemy) [Beat Reverse Rebirth] |
||
| Lexaeus (Enemy) [Beat Reverse Rebirth] |
||
| Hidden Room | None | |
| Doors | ||
| Key of Beginnings | 1 Blue, 3 Red, 99, Key of Beginnings | |
| Key of Guidance | None | |
| Key to Truth | None | |
| Key to Rewards | None | |
Honestly, I wouldn't say that Castle Oblivion is especially difficult, but it is large, so you can get a lot of levelling in by running laps around the place. You're also more likely to gain Key to Rewards cards on this level than on any other, so it's worth just repeatedly battling in here; as soon as you get them, zip off to a level you haven't yet raided and then come back to Castle Oblivion to get your next one.
Boss: Axel II
Location: Castle Oblivion, Floor 13, Key of Beginnings room
Use the Riku card to strengthen your fire defence, whilst enabling you to keep cards used in sleights. Pummel Axel with as many Ice-based sleights as you can, to greatly reduce his HP, but be on the lookoout for his Firetooth sleight. Since it's completely unpredictable in how it moves, it's best to Card Break it, instead of attempting to avoid it. The Larxene card will enable you to outrun him, which makes it useful; if equipped, make absolutely certain to avoid/Card Break Fire Wall and Firetooth.
Win: Axel card
Boss: Marluxia I
Location: Castle Oblivion, Floor 13
While fighting Marluxia, stick to middle range. It'll avoid his shockwave attack, and give you enough time to Dodge Roll through his other basic moves
Marluxia's two sleights, Blossom Shower and Deathscythe, whilst both very damaging, are also very easy to avoid. For Blossom Shower, Dodge-Roll just as the petals start to disappear. For Deathscythe, Dodge-Roll as soon as the energy blade appears. With those negated, there is no need to break Marluxia's sleights, so save your 0 value cards for his normal attacks.
The Darkside card is godly in this battle, since Marluxia's enemy card is the Double Sleight ability. Steal it quickly and then spam your physical sleights to do humongous damage. Adding in the Maleficent card will render you insanely powerful against this, the penultimate boss.
Win: Marluxia card
If you're a completionist, it's very important to save into a separate slot after defeating Marluxia the first time, so you can reload it upon clearing Reverse Rebirth. This will allow you access to several other cards you couldn't get beforehand. After you're done with your preparations, return for the final boss battle!
Boss: Marluxia II
Location: Castle Oblivion, Floor 13
This fight is absolutely infuriating. It's not that Marluxia is particularly fast or powerful, it's just that he has so much HP and you get hardly any opportunities to actually hit him.
Since the battle is so long, it's important to know his attacks in detail. Whenever he releases three floating buds, Card Break their attacks to destroy them, which will reduce the number of attacks against you, but will also eliminate extra targets than can distract Sora from attacking Marluxia.
When he releases several blooming flowers, Card Break the attack, or they'll rush along the ground and pummel the crap out of you. Note that you can get in an attack on Marluxia after Card Breaking this particular attack.
Blossom Shower and Deathscythe from the previous encounter have both been downgraded to normal attacks; dodge both of them like you did previously, and take out the legs of Marluxia's robot to disable Deathscythe.
Once they're gone, Marluxia's robot will start to jump from side-to-side, trying to crush you, whilst also creating a large shockwave which hits over half of the screen; Dodge-Roll just as it's about to hit to avoid it.
After a few of those, he'll switch to fast dashes THROUGH Sora, though they don't actually hit until the robot reaches the far side of the screen. It's very important to Card Break this attack, since it gives you the opportunity to jump up onto the back of the robot and pummel Marluxia. Just be sure to have taken out all of the blossom buds, or you might wind up attacking them instead of Marluxia.
The longer you stay on the robot's back, the harder the wind will push against you. You need to Dodge-Roll occasionally to stay onboard, but eventually you will be pushed off, there's no avoiding it.
After that, Marluxia will use either Blossom Shower or the blooming flower attack, before then releasing another batch of blossom buds. Once that's done, he'll go back to jumping, starting the pattern all over again.
You'll need to bring lots of 0 cards and restorative items. Low value attack cards aren't much good, and most sleights are useless against Marluxia, though Omnislash and Judgment will actually hit him, so the Marluxia enemy card can be useful to double up their usages. High value Cure cards can be used to break his attacks and heal you up, making them incredibly useful in this fight.
Overall, the key to this battle is to play it safe and be patient.
Win: Unlock Reverse Rebirth
 Games
Games