


((This post is intended to be a frontsite article))
Breaking Your Level Cap - Genkai 1
Once you have your main job and assorted subs levelled to 49-50, it's time to do your first limit break quest; These quests are called by a variety of different names, mostly "(insert level here) cap" and "Genkai #" or G# where # represents the sequence; These caps occur every 5 levels from 50 onwards, but only have to be done once per character, not once per job.
When you are ready to start G1, head to Ru'Lude Gardens in Jeuno and talk to an old man way in the back named Maat; He will ask you to obtain Ancient Papyrus, a Chunk of Bomb Coal, and a Clump of Exoray Mold. At level 50, none of these things are soloable (You might beat an exoray with your 2-hour ability depending on job, but the drop rate isn't 100% and you'd risk permanent brain damage IRL if you were to try). If you don't have a linkshell, you'll need to /shout or /yell for help in Port Jeuno. It shouldn't take long to find a bored level 99 to tag along--new players are rare, and these quests are fun on high level jobs.
We'll take this in order of most-to-least hemorrhoidal to obtain.
First you'll want to head to the Eldieme Necropolis, accessed through the Batalia Downs. The best camp is through the northernmost entrance; If you have the Wings of the Goddess expansion, the north camp is easy to reach through the "Lycopodium Warp" -- you talk to a Lycopodium NPC in the north of Batalia Downs in the past (Shadowreign era), then return to the present. Where the Lycopodium NPC was, there will be a sparkle on the ground. Trading certain flowers (I use Amyrillis) to that sparkle will teleport you to the top of the cliff that would ordinarily make the north entrance unreachable from the Jeuno entrance to Batalia.
If you or your helper doesn't have WotG, you'll have to head to the westernmost entrance and you'll have to work a switch to allow your helper to reach the target mobs. The target mobs are Liches. The drop rate on Ancient Papyrus is abysmal, so if you don't have a Thief helping you, get ready for a long wait. Once the Papy drops, lot on it and have your helper pass. This is actually the only part that a beastmaster can't really solo, due to the lack of charmable mobs located near the targets -- everything in Eldieme is undead.
Next up is the Bomb Coal. Bomb Coal is a 100% drop, so it won't take long, but the camp is a pain to get to if you and your helper don't have Wings of the Goddess. Bomb Coal drops from Explosures, which sometimes use Self-Destruct, so do not "help" your helper. You will die. It should be noted at this point that Beastmasters can solo this drop at level 50 by continuously throwing the nearby bats at the Explosures until they blow up and you get the drop.
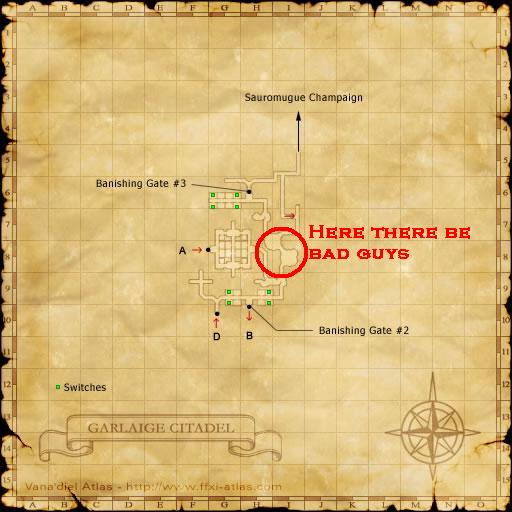
The easiest way to get to the camp is through Wings of the Goddess; Go to Sauromugue Champaign in the past, then travel through the Shadowreign version of Garlaige Citadel by hugging the left wall until you exit to the elevated portion of Sauro. You'll find a Cavernous Maw there that will warp you to the same location in the present, which allows you to enter present-day Garlaige Citadel through the back door. This way you can reach the Explosures without passing any banishing gates. Without WotG, you will need three helpers to get past Banishing Gate #1 by standing on the four weighted plates. Watch out for Old Two-Wings if you're trying to BST solo this.
Explosures are quite a bit more rare than they used to be in 75 cap days, and can only be found in one place in the Citadel. It would be a pain in the arse to explain how to get there, so here is a map:
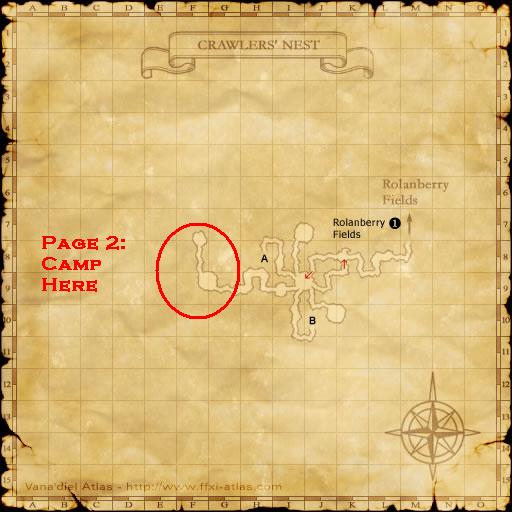
Lastly, the Exoray Mold drops from Exorays in the Crawler's Nest. Travel to the south of Rolanberry Fields to find the entrance to the Nest. Getting the map for the Nest is a massive pain in the reproductive-type organs, so just wander around until you find an Exoray or two (if you're trying to BST solo) or let your helper guide you. There are some Exorays to be found just west of the first circular room in the Nest that have dragonfly mobs that you can charm and send after them, but sometimes people exp on those since there's a page that sends you after exactly those mobs. Exorays are found in groups deeper into the Nest, but the only thing around those to charm is other Exorays, and they're pretty tough to charm until you're higher than their level. Which you're not, if you're doing this quest. You might be able to take a single Exo with a jug pet down there, but you will get linked on. Seriously, avoid the basement if you're trying to BST-solo this.
Once you have all three items, it's time to head back to Maat and trade him all 3 . Your level limit is now 55! Time to go back to levelling.
Levels 50-55: More Crawler's Nest!
I know you're probably sick of this place by now after doing Page 1 (Bees & Worker Crawlers) for ten freaking levels, but it's seriously the best exp I've been able to find for this level, especially if there are others down there doing Page 1 in their 40s that you can sync to. At 50 you can also do Page 2 depending on job -- links can prove deadly unless you have some form of AoE sleep like Lullaby or Sheep Song. (Sleepga is too readily interrupted). If you have 2 people at level 50-55, you can probably handle any links, especially if one is a healer or a sleeper The target will be 3x Beetles and 3x Soldier Crawlers. The Beetles are nonaggressive but link by sight. The crawlers, however, aggro by sound, link, and stay close enough together to mate with one another at all times. There are only three crawlers to be had, but by the time you knock out your 3 beetles, they will have respawned. There's a great big freaking scorpion in the hallway between the beetles and the crawlers, but you can either sneak past (sub DNC for Spectral Jig is great for this), or just kill it. BST can also charm the scorpion and use it to mess up the crawlers.
Camp for Page 2 is below:
Now it's time for another Genkai! Bet you're excited!
Breaking Your Level Cap - Genkai 2
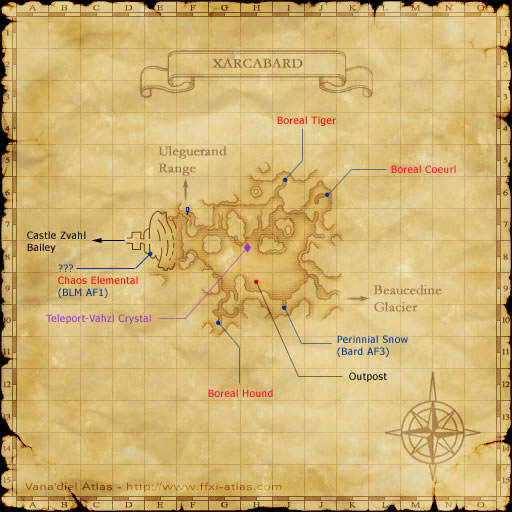
This is another one you'll need help with, even as a BST, since there is nothing charmable near the target mobs. Maat will tell you to head to Xarcabard and obtain 3 Frigicites. Each Frigicite is guarded by a truesight/truesound NM with a very short respawn time (so they're effectively always up) and an even shorter temper. Since you need help with this, your best bet is to make sure that you have stealth (Spectral Jig, sneak/invis, or oils/powders) and follow your helper around like a little lost puppy, and then be ready to check the ??? as soon as it spawns following the guardian NM's death and then run like a bat out of hell before said NM respawns and rapes your face. Just because it's easy for me to do, though, here's a map that shows the 3 spawn points:
I didn't even have to edit this map
See? That wasn't as bad as G1. Off to Maat and talk to him to have your level cap raised to 60.
Level 55-60 - GUESS WHERE!
Yep, back to the Crawler's Nest for five more flipping levels. You'll want do do Page 2 for this; if you wind up duoing or forming a proper party, you may want to cut over to the page that has you kill hornflies and exorays, which I believe is Page 4.
Time for another genkai.
Breaking Your Level Cap - Genkai 3
G3 is a massive pain in the hoo-has, but it is definitely soloable. What makes it so bad is the amount of travelling that needs to be done. You'll need to obtain 3 crests, one from each major Beastman stronghold, all 3 of which are guarded by truesight/truesound NMs that you cannot possibly kill on your own. You will also need to have Rank 5 or greater in at least one city to proceed. This is a long freaking quest.
As with G1, I'll list this in reverse hemorrhoidal order.
Castle Oztroja
From Port Jeuno, exit to Sauromugue Champaign, then south to the Merihptaud Mountains. You'll find Castle Oztroja in the southeast, below Drogaroga's Spine. From the entrance head west to a closed door with 2 handles and a trap door in front of it. One handle will open the trap door, one will open the door you need to go through. Which handle you need is randomized once per Vana'diel day. You'll need to stand in between the handles to trigger them, but if you're quick, you can get off the trap door before it opens, and the real door will stay open long enough for you to reverse course and make it through. Follow the left wall until you come to another door with four levers in front of it. The four levers are a combination lock; the combination changes once per Vana'diel day, and can be found in a hidden room to the south of here. Now basically go forward FFXIII-style in the only directions you can until you reach a third closed door. This one is a pain in the arse. If you're not a THF, you'll need a Hermes Quencher and a Scroll of Instant Reraise. Outside the door are four torches guarded by high-level Yagudo. Reraise up, drop invis, drink your quencher, hit the torch, and run for the door. You have just enough time to make it, but you'll have a bunch of unkillable Yags all over you and you will die. Just make sure you die on the far side of the door. Wait until the Yagudo despawn, then raise up. Now you have to talk to a pedestal which will ask for a series of 3 randomized passwords. Order is not important, and the possible passwords are as follows: Domi, Puqu, Gadu, Deggi, Mjuu, Xalmo, Haqa, Mong, Ouzi, Duzu, Buxu, Quu, Misu, Xicu, Ovzi, Duxo, Zhuu.
If you've come as THF, the last door is much easier. You hit the torch, trigger Flee, and run through the door and use Hide. Since Yagudo are sight-only, they'll deaggro and you can continue without dying.
Once you are in the next area, be careful as hell. The Yagudo High Priest is True Sight, so can see through your Invisible. Make sure his back is turned before approaching the ??? on the dais. Drop invis, grab the ???, and Warp.
Davoi
Head to (H-11) and enter the Monastic Cavern, then hug the right-hand wall until you re-emerge in Davoi. Cross a bridge to the east of you until you emerge at a T-intersection. We will refer to this as Zero Point.
If you have a helper who already has a Crimson Orb, skip ahead to the italicized heading that says Zero Point.
You will now need to do a mini-quest to get a Crimson Orb. Head North from the intersection at Zero Point and talk to Sedal-Godjal, who gives you a white orb. Head back out through Monastic Cavern to the first part of Davoi; around the perimeter you will find four ponds at (H-10), (L-9), (E-8), and a hidden area reached through a river at (H-6). These ponds are all marked on the Davoi Map on Vana'diel Atlas (Vana'diel Atlas: Final Fantasy XI Maps collection - Treasure, NM, Quests, and Missions locations). The order's not important, but when you trigger the fourth pond, you will be cursed. This can be lifted either by Cursna, or by waiting for a devil of a long time. Now head back to Sedal-Godjal who will turn your Cursed Orb into a Crimson Orb. Return to Zero Point
Zero Point
Now head South where you will find a shimmering wall. You'll need to drop Invis to interact with it; the Crimson Orb makes it permeable for a brief period. You will get aggro, but the zoneline is close. Book it. From here, just hug the left wall and be super careful of the true sight NMs. Also make sure you don't drop down any ledges; the ??? is on one, and you can't reach it from the bottom. It should be pretty easy to avoid the aggro and safely get the ???. Warp back.
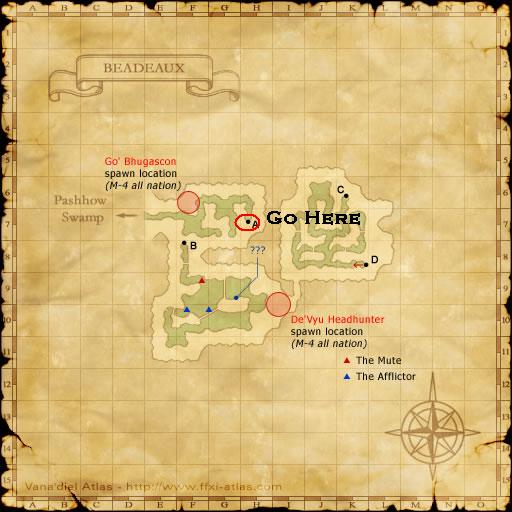
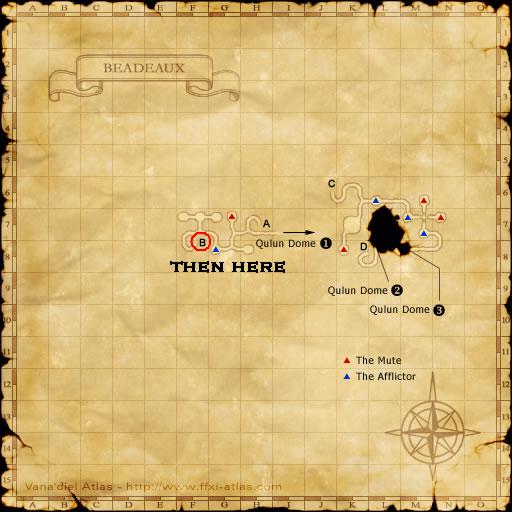
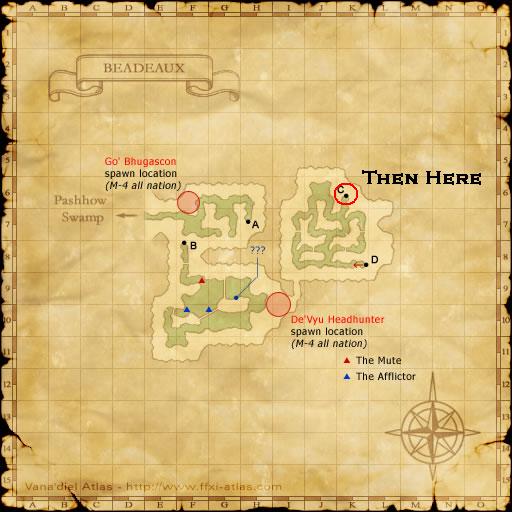
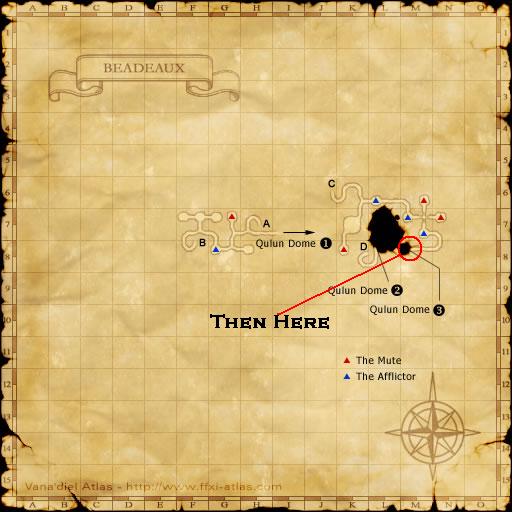
Beadeaux
The directions are a bit of a pain, so here are some maps:
At this point, you'll want to take a door to your right -- Look out for Ruby Quadav, she's True Hearing; Then hug the left wall until you hit the ??? and warp out.
Once you have all three quests, talk to Maat and your level limit is now 65! There are no more Genkai quests as bad as these first three, unless you count the 95 cap, which requires a full party.
Level 60-65: Bostaunieux Oubliette
Enter Bostaunieux Oubliette from Chateau d'Oraguille in San d'Oria and you're already at camp. There's a Grounds Tome right there, so grab Page 2 and start killing bats. Like with the Nest, you'll usually find others exping there to team up with -- in fact, you might need at least a duo from 60-62, but after 20 levels in the Nest, you'll be ready to level anywhere else. It might not seem so bad on your first run through when you're taking breaks to do genkai, but if it's not your first time going through those levels, believe me, you'll be cheering for the change of location. Bats are pretty easy if you have any sort of piercing damage. THF reigns supreme here. Just watch out for Jet Stream from the triple-bat sets, it hits hard.
Breaking Your Level Cap - Genkai 4
Remember how I said there were no more really bad genkais? I was specifically talking about this one. When you open the quest with Maat, he'll describe four people, and tell you to give them each a Kindred's Seal. Maat even gives you the seals! In some cases, you'll be able to figure out on your own who the people are without help. If not there is a handy little table on ffxiclopedia and gamerescape which will not be duplicated here because that would be stealing. Also, by now you should be used to referring to the wikis on a regular basis. If you're not, I'm going to make you do it for your own good.
After trading the four Kindred's Seals, report back to Maat to have your level cap raised to 70.
Level 65-70: The Boyahda Tree
There are two camps here; you should start at Camp 1 and then move onto Camp 2. When to switch varies from job to job, and by now you should be able to exercise your own discretion as to when to switch. It should be noted that you can come to Boya as early as Level 63, and in some cases switch to Camp 2 right at 65.
Camp 1: Page 1: 3x Bark Spiders, 3x Death Caps
This is a roaming camp; There are a lot of spiders and 'shrooms clumped closely together as soon as you zone into Boya. Both spiders and shrooms link (spiders by sight, shrooms by sound), so you will get adds. Be careful and keep Reraise on at all times. These mobs aren't aggressive, so if you do get dropped, you can rez up right away and rest in plain sight until weakness wears. This camp is balls to the wall awesome for beastmasters, since there are almost always 2 mobs in linking distance of each other and you can just charm one and sic it on the other.
Camp 2: Page 2: 4x Mouriooches, 3x Robber Crabs
The mandragora link but do not aggro; The crabs aggro sound but do not link. This camp is quite good for skillups, and you can easily cap your weapons for level 70. Both are charmable, but mandragora are very resistant to charm, so BST should really try to stay at Camp 1 as long as they can. AoE sleep is a godsend here, since mandragora links are practically guaranteed. This camp is a lot of fun as Monk, since neither mob hits very hard, so you can activate Counterstance.
Breaking Your Level Cap - Genkai 5
When you talk to Maat, he will challenge you to a duel; First, you will have to farm a Testimony for the job that you want to fight him on. These Testimonies drop from high 60s-low 70s mobs throughout Vana'diel; If a mob drops a testimony, it will be for whatever job the mob is. It will probably be necessary to get a helper to farm a testimony for you, Square-Enix intended it to be done in parties of sub-70 characters, and those simply do not form anymore. The exception to this is Beastmaster; BST can easily farm their own testimonies from Goblin Shepherds in Gustav Tunnel. Each job will be going after different targets, so use your wiki powers here.
When you trade your Testimony to Maat, he will warp you to one of the Burning Circles located throughout Vana'diel. When you enter, you will be unable to use your subjob, and Maat will be the same job and level as you -- you can attempt this fight as early as level 66, but it's advisable to wait until 70. Strategies for the Maat fight, like your choice of locations to farm testimonies, is job-specific, so you'll have to use a wiki here.
Report back to Maat in Ru'Lude Gardens to have your level increased to 75!
Level 70-75: Multiple Choices
Really, there aren't a lot of camp choices that I like post-70. You can keep on doing Page 2 in Boya all the way to 75, but it gets boring pretty fast.
Another option is to go back to Bostaunieux Oubliette and do Page 4, which sends you after 9 Bloodsuckers (leech-type mobs); This kind of sucks in that you have to kill 9 mobs per page, but there are buttloads of leeches down there. They link, but above level 70 you should not only be able to handle links but welcome them since every mob you fight is going to count towards a page. This option is much better in small groups.
I quite like Boyada Tree Page 4, but that's highly job dependent as some of the target mobs are up to level 75, which means you could find yourself facing mobs that conn Tough or better to you. Best to set this option aside until at least 74. The advantage to finishing up on Page 4 is that you can come in and do Pages 1&2 to build up your GoV chain up until each page is giving maximum exp and you have a few rockin' prowesses, and then make quick work of the Korrigans (mandy type) and Goobbues deeper into the tree.
Congratulations! You are now Level 75!
After reaching Level 75, you should return to Ru'Lude Gardens at your earliest convenience to unlock the Merit Points system; all remaining level caps until G10 (changes level cap from 95-99) require spending merit points, and depending on job, you can get some pretty spiffy bonuses from merits. MP-using jobs will also want to get 15/15 MP merits right away.
From 75 on, you are looking at 45k+ experience points for each level, not counting merits, so it is strongly advised that you do all of your levelling in Abyssea from this point onwards. In addition to being much better exp, it allows you to accumulate cruor, which can be exchanged for gil by buying vendorable items at a favourable rate.
This concludes this document. Please return your chairs and seatbacks to the upright locked position and ensure that the vehicle has come to a complete stop before exiting. We hope you have enjoyed this guide and...hey cool I just spoke in the pluralis majestis. Now bugger off.

 Reply With Quote