images courtesy of ffxi.gamerescape.com, prior to modifications
Getting Started - Character Creation
I'm going to assume that you've read about the basics of the game, here on EoFF or elsewhere and you've already decided on a starting race and nation. Now that Outpost warps aren't lost when changing nations, I
strongly advise choosing the nation that your race is native to: Windurst for Tarutaru and Mithra, Bastok for Hume or Galka, or San d'Oria for Elvaan. This provides you with a Level 1 RSE (Race-Specific Equipment) that gives you bonuses condign to your race.
If the nation you want doesn't match with the race you want, you can always switch for 4,000 gil when the nation you want is in third place in the conquest ranking, and you get to keep your Outpost warp and RSE ring. Since Sarutabaruta, Ronfaure, and Gustaberg rarely change hands these days, make sure you get the appropriate outpost warp before changing allegiance.
On Job Selection: Before creating a character, it is a good idea to decide which of the 20 jobs in FFXI is going to be your
main job. What is unique about FFXI is its job system. You do not only have a main job at any given time, but a support job (subjob) that is 1/2 the level of your main or the highest level you've achieved on it, whichever is less. Your main job will determine what subjobs are needful.
As an example, a Beastmaster (BST) main, like most melee jobs, will usually sub Dancer (DNC). Both BST and DNC are Advanced jobs that you cannot select during character creation. However, in order to sub DNC, you have to get it to level 49 in order to have a fully-levelled sub when your BST reaches level 99. In order to get DNC to 49, you need a sub
for your sub. Fortunately, both of the best subs for DNC are starter jobs: Warrior (WAR) and Monk (MNK).
Second example, for mage types: Assume you want to be a Black Mage (BLM) main. Your main subjob after level 82 will be Red Mage (RDM) for the Refresh spell, but up until then, depending on playstyle, you may want to sub White Mage (WHM), Scholar (SCH), or Ninja (NIN).
So, for example 1, I'd advise starting as a MNK, and for example 2, I'd advise starting as a WHM. WHM is very expensive as a first job, though; not only are some spells incredibly expensive (fortunately the super-expensive teleports can be quested), but DNC sub isn't that great since you'll be healing yourself with magic for skillups; For soloing whm before 75, your ideal sub would be Ninja (NIN), and that's also very expensive, both in terms of acquiring NIN's signature spell Utsusemi and the ninja tools needed to cast it. Utsusemi is
why you'd want to WHM/NIN for solo, so you can't really skip it.
If there is any indecision involved in what job to start with, take MNK -- The Level 95 cap is a breeze with 5 Monks and 1 Summoner (SMN) with the Alexander avatar. Alexander is extremely difficult to get for a starting player, and Monk is very easy to level with very little gil. Once you get a high level job (90+), you will find it much easier to finance levelling new jobs by converting the Cruor you gain while levelling into gil. This, too, is beyond the scope of this document.
For the purposes of this document, my example player will be a Monk main as that's the simplest to explain and will make this document less intimidating.
Avoid mage jobs when first starting unless you're a real keener, because the cost of spells is prohibitive. Some spells cost over a million gil for a
single spell!
When you start in your town of choice, you will immediately be given an Adventurer's Coupon that can be exchanged for 50 gil; The NPC giving you the coupon will show you a map with the location of the person who can exchange it, but this marker is only available when the starter NPC shows you the map, so mark it well.
For this document, we will be assuming that you are starting in Windurst, a city selected essentially at random. I'm also assuming that you have selected monk as your first job and are either Tarutaru or Mithra, so mentally adjust as needed if any of these assumptions is off.
Go first to the location you saw on your map during the opening cutscene and Trade your Adventurer's Coupon to the specified NPC, which will very with what city you start in and which part of the city you're randomly deposited in. That NPC will then direct you to the New Adventurer's Guide for your city. Locations are as follows:
San d'Oria: Alaune, Southern San d'Oria map square (G-10)
Bastok: Guildago, Bastok Markets map square (D-11)
Windurst: Selele, Windurst Woods map square (K-10)
In all 3 cases, the Tutorial NPC is located near a town exit.
Levels 1-11: Tutorial NPC

First, Selele will ask you to activate Signet on your character. This is good practice as you should have Signet active at all times unless you are in an Aht Urgan or Wings of the Goddess area much later in the game. You can get Signet from Harara, W.W. who is standing right beside Selele. Talk to Selele again for 6 strips of meat jerky.
Now eat a strip of meat jerky by selecting it from your inventory and choosing "Use." Talk to Selele again, and she will ask you to master a Weapon Skill. It's time to go outside.
Right outside the gates of Windurst, you will see a Field Manual. "Talk" to it and select training regimen, page 1. This will ask you to kill 6 Mandragora. Every 6 Mandragora you kill you will get bonus exp. Keep on killing them until your weapon skill level reaches Level 5, whereupon you will get your first Weapon Skill, Combo. Unleash this weapon skill on a mob, finish your page, and head back on into Windurst. At this point you will only be Rank One, so Signet doesn't last very long. It is advised you reapply it every time you leave town from here on. Ranking up is beyond the scope of this document. For ranking up, refer to ffxi.gamerescape.com if it's up, or ffxiclopedia.org if it's not. Both sites have the same information, but ffxiclopedia is plagued by the galaxy's most irritating ads.
Upon talking to Selele, you will be given a Water Crystal, a Bird Egg, and a Pot of Honey. Select the Water Crystal from your inventory, and drop in the egg and the honey and hit OK to synthesize a Mug of Honeyed Egg, which you can eat for stat boosts, much like the Meat Jerky you got earlier on. The Honeyed Egg is better for mages, and the Jerky is better for melee.
Selele will then direct you to the Auction House. Go there and browse the merchandise, but don't buy anything. You probably don't have a stack of crystals to sell yet, so really just look, close the window, and go back to Selele, who will give you a voucher for an EXP-boosting ring. She says to get a Chariot Band, but don't.
Talk to Harara, W.W. again, and select "I want to spend my conquest points" even though you don't have any conquest points to spend. Select Emperor Band from the list, and you'll get it in exchange for the voucher. Emperor Band has fewer charges, but provides a bigger exp boost, and if you have a job or school, you're probably only going to use 3 charges a week anyways.
When used, the Emperor Band will give you a 50% boost in Experience Points gained up to a maximum of 2,000 bonus exp. It has a 20-hour cooldown period, but when you use your third charge, you can recharge it for 600 Conquest Points (which you will have by this point). When you recharge it, the cooldown period is reset to zero, so you will be able to reactivate your bonus exp as soon as it wears off.
Assuming you're playing Saturday and Sunday, you'll want to go into Saturday with 2 charges left; use one on Saturday. On Sunday, before heading out to level, activate your exp ring, then recharge it. Duration doesn't stack, so don't activate your second charge until the first one wears off.
Selele now asks you to get Level 4, which you probably have already done, so just talk to her again for a Raising Earring. If you've bought the game new from S-E's site, you have a Destrier Beret that gives you auto-reraise, but that only lasts until level 30, so keep the earring to use later on.
Now, if you're not already level 10, you'll want to go back out to Sarutabaruta and do pages until you are. Selele's next task is to go to Tahrongi Canyon and kill a monster. Absolutely anything will do, so just kill the first thing you see.
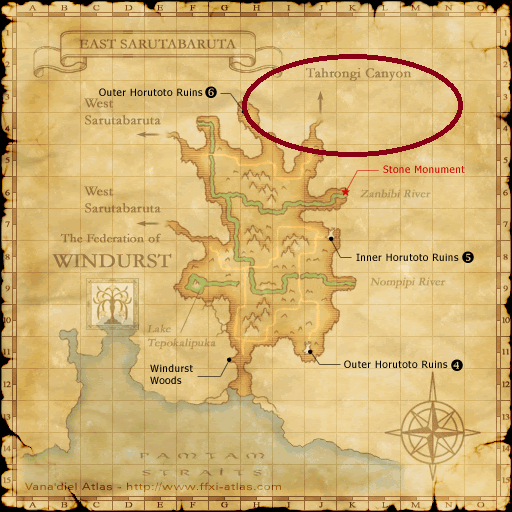
While you're here, head north to the Crag of Mea -- it should be marked prominently on your map, which you should have had included if you started in Windurst. On the north side of the crag, you'll see a giant teleport crystal. "Talk" to it to attune yourself to the Crag. This will allow you to teleport straight here later through the White Mage spell Teleport-Mea. WHM teleports aren't used as much anymore, but you'll need to be attuned to Mea for the next quest.
Return to Windurst and talk to Selele once for a bonus 800 EXP. Your next task will be to gain level 10. You've already done this unless you, at your peril, ignored my advice. Talk to her again for 1000 gil. This will come in handy if and when you decide to change nations.
The final thing Selele asks you to do is get the Mea Gate Crystal. If you listened to me, this, too, is done. Talk to her one last time for your final reward: 1000 bonus EXP and 3 Chocopasses which you'll never use because they don't last long enough to be worthwhile.
The Tutorial NPC will only be available when you first start; For levels 1-11 on subsequent jobs, just do pages in Sarutabaruta, Ronfaure, or Gustaberg.
Your First Grind: Level 11-30/31 - King Ranperre's Tomb
Protip: These levels really suck. It gets better, it does.
Now it's time to head to San d'Oria. If the Super Kupower Ease of Exploration is active, you can pay the Explorer Moogle outside of the residential area in Port Windurst 300 gil to be teleported straight there. If not, the trip there is outside of the scope of this document because it's going to take a while. It's worth the trip, though, since the level 11-30 options around Windy are pretty trash.
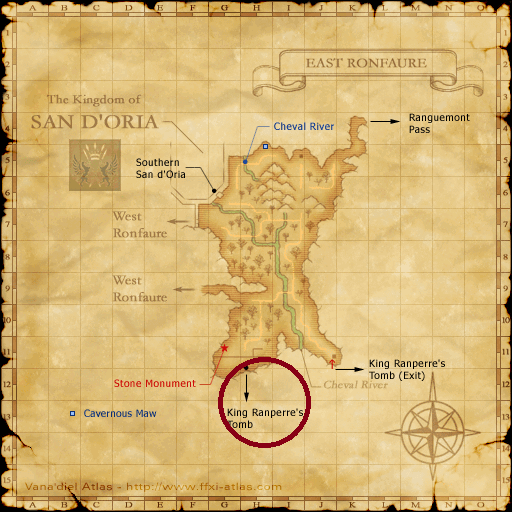
Exit Southern San'Doria from the Eastern exit and go straight south until you come to King Ranperre's Tomb. Right inside, you will see a Grounds Tome. This is essentially a Field Manual on crack. You still get exp rewards every time you finish a page, plus gil and tabs once per Vana'diel day, but the rewards increase with every page you complete as long as you stay in the same zone.
 Levels 11-15/16: Worms and Bats (Page 2)
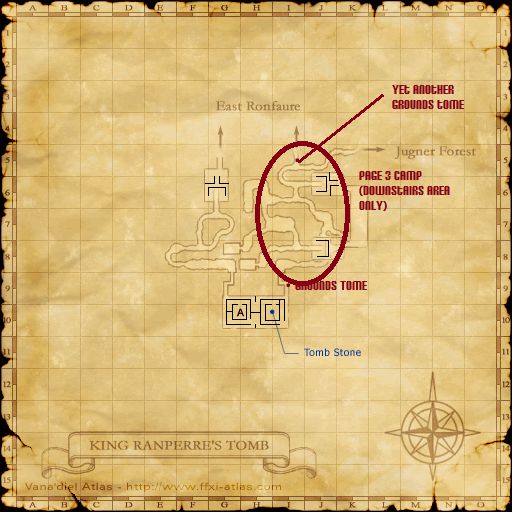
Start with Page 2, which sends you after 4 worms and 2 bats. You'll find 2 of the worms on the way to the bats. Kill the 2 worms, then follow the left wall until you find a wind bat. Be careful as a Tier 2 goblin (Ambusher, Butcher, and Tinkerer) will be patrolling that area and it will utterly destroy you at level 11. Keep running back and forth between the bats and the 2 worms until level 15 or 16. There are more worms past the bats, but the goblins make killing them problematical, since goblins are aggressive.
 Levels 15-23/24 Tier 2 Goblins (Page 3)
Once you reach Level 15-16, you'll want to switch to Page 3 -- fortunately there's a Grounds Tome right in the tunnel leading to the Wind Bats and Tier 2 goblins are. Your target is now the Tier 2 goblins themselves; This is annoying, since you'll need 2 of each of the 3 types of goblins, and there's always one type of goblin that won't spawn, forcing you to kill hordes of mobs that don't count towards your page. It will be tough going at first, but you'll plow through them quickly as you level. You'll want to stay on Tier 2 goblins until about level 23 or 24, when they start becoming Too Weak and stop giving exp.
 Levels 23-30/31 Tier 3 Goblins (Page 5)
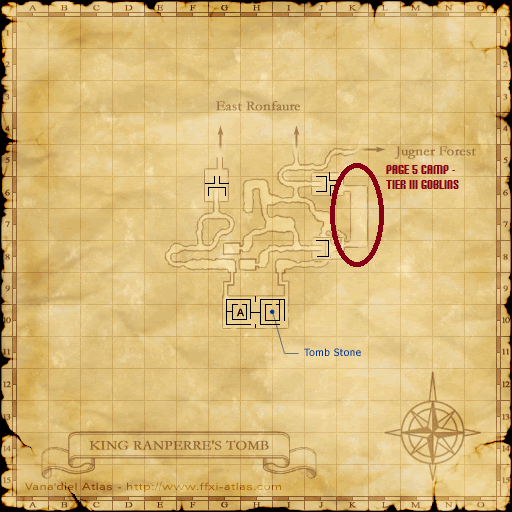
At level 23-24, you'll want to switch to Page 5 and head upstairs to fight Tier 3 goblins (Muggers, Leechers, and Gamblers) They have the same problem as the Tier 2s, with one type of gob failing to spawn at all times. By now, though, you should have built up enough prowesses and exp bonuses that you'll be able to tear through levels 24-30 in jig time.
Depending on how long you've stayed in the Tomb without leaving, you may want to stay til level 31 before zoning out and losing your cumulative exp bonus.
Once reaching 50 on your main job, it's a good idea to identify what subjobs you are going to want to use and level them to 49 before going on to your level cap quests; For one thing, being capped gives you an excuse to leave one of those impromptu Nest parties at 50 without being even a little impolite, and for another, once you start hitting high levels, you are not going to want to come back to level a subjob, even though gil will be easier to come by and you can equip a new job with much more ease. Once you are ready to break your level cap, be looking for the next in this series of articles.


 Reply With Quote


