Which chapter exactly is that again? Are you talking about chapter 5?

Which chapter exactly is that again? Are you talking about chapter 5?
Apparently, I have been declared banished.


Yes, chapter 5
Chapter 5
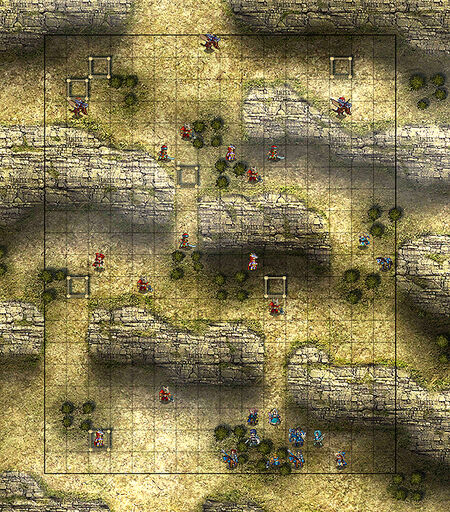
For this, you want to save Maribelle and Ricken right away. Have Frederick move up first to take care of the bad guys right away. It will help to have several guys follow behind. Take your swordsmen left to handle the axe users. Once you have Maribelle and Ricken together with the rest of the group, it should be easy sailing, just stick together as the enemies come for you.
Edit: Honestly, it's been awhile since I've done this chapter in the story. I think it would be helpful to explain your problem in this chapter.
Last edited by Agent Proto; 08-02-2014 at 04:05 AM.
Apparently, I have been declared banished.
Enemies keep spawning and its giving me a hard time :/
Ok, let's break down to some good old fashion tactics.
First, as I said, we need to abuse Pair Up. I think that chapter lets you place your units. You want the units who will be taking action near the front lines (the north and west sides of the map, in this case), and those pairing with them in the rear.
Keep in mind as well that when Paired Up, you can move, then switch which character is in the lead. So, since you want Sumia and Chrom together, pair them up with Chrom as the supporting character to Sumia. Take advantage of her movement to fly next to an enemy, then use "Switch" to put Chrom in the lead for the attack, since he is likely stronger (and definitely stronger against the Wyvern Riders, since Falchion is a sword to their axe, and does critical damage to Dragon units).
As for the battle itself. Deploy Frederick where Lissa is on Proto's map. On the first turn, have one of your other Pairs take out the Axe Wielder to the north, then have Frederick rush north and take out that Mage.
Eliminating Mages is one of your main priorities here. You can counter most other enemies to death, but mages hit from range, and most of your units will have lower Resist. With those two units clear, you have a bit of breathing room. Us Sumia and Chrom to snipe the mage to the west (fly Sumia in, then switch to Chrom and have him kill the Mage). Rush another unit (either Stahl or Sully) to take out the Axe wielder. Then turtle your teams up into two groups.
Whenever you can, sit your units on the Fortresses. Reinforcements can spawn there if you don't (I don't remember if they spawn on Easy or not) but more importantly, forts will heal your units each turn and boost evasion and defense.
When Ricken and Maribelle arrive, pair Ricken onto Maribelle and use her superior movement to get them behind your heavy fighters (then switch so Ricken is in front once they're safe, because he can actually attack).
Turtle up, stay on the fortresses, and keep your weaker units back. Should be good after that.
My friend Delzethin is currently running a GoFundMe account to pay for some extended medical troubles he's had. He's had chronic issues and lifetime troubles that have really crippled his career opportunities, and he's trying to get enough funding to get back to a stable medical situation. If you like his content, please support his GoFundMe, or even just contribute to his Patreon.
He can really use a hand with this, and any support you can offer is appreciated.
Thanks guys I'll let you know how it goes when my battery charges up!
Alrighty I have won the battleThanks guys!
Now I just started a different mission and there is this girl named Anna and she is adorable
I hope I can recruit her!!!
I love Anna, she's so awesome! You can recruit her later.
Apparently, I have been declared banished.
How come sometimes the "linked" character will attack and sometimes they won't?
That's called a "Dual Attack". When you go to attack, in the lower left corner, you should see two icons, each with a percentage. The sword represents the chance to Dual Attack, the shield represents the chance to Dual Guard (when the paired unit jumps in to negate a hit).Originally Posted by shion

These percentages are based on the stats of the two units who are linked together. The more skill the units have, the higher the chance to Dual Strike. The more defense they have, the higher the Dual Guard chance.
Increasing Support Rank further increases this bonus.
Also, you actually can't recruit that Anna. You can recruit one of her sisters though. ...Who happens to look exactly like her (Anna is one of the very few recurring characters throughout the series, and apparently each Anna is a different member of the same family).
My friend Delzethin is currently running a GoFundMe account to pay for some extended medical troubles he's had. He's had chronic issues and lifetime troubles that have really crippled his career opportunities, and he's trying to get enough funding to get back to a stable medical situation. If you like his content, please support his GoFundMe, or even just contribute to his Patreon.
He can really use a hand with this, and any support you can offer is appreciated.

Oh okay, thanks for explaining!
So Anna is like Nurse Joy and Officer Jenny from Pokemon
Is it terribly bad if I failed to save the villagers in paralogue 3? I failed like 4 times because they just KEPT RUNNING RIGHT AT THE ENEMY
Also, where do I get more Beaststones for Panne?
As long as you save one, you get the Seraph Robe, which is by far the best item reward for saving them. For saving the other two, you get a log and a ladle, both weapons with only 1 Might, basically jokes.
You can buy them in the shop that opens up when you clear Chapter 12, or find them from sparkly tiles if you're lucky. Some people will sell them in their StreetPass shops as well (I don't think any of the Bonus Box teams sell them, though).Also, where do I get more Beaststones for Panne?
My friend Delzethin is currently running a GoFundMe account to pay for some extended medical troubles he's had. He's had chronic issues and lifetime troubles that have really crippled his career opportunities, and he's trying to get enough funding to get back to a stable medical situation. If you like his content, please support his GoFundMe, or even just contribute to his Patreon.
He can really use a hand with this, and any support you can offer is appreciated.
There is a function where you can upgrade a character class to a 2nd tier. It's best to not upgrade when you first can (Level 10) but wait until level 20 (Max level) before uploading. Will give you overall better stats.
I used the Masters seal on my main character as soon as I got it, and she was seriously underpowered when she reached max level. I ended up taking her on another route and leveling her up there to cover the stat deficiency.
I've actually upgraded most of mine now at level 15ish~
I am at Chapter 13 now!
 Posting Permissions


 Reply With Quote