-
dizzy up the girl
Recognized Member


Contributions
- Hosted Eyes on You
- Former Cid's Knight
 Rye's tutorial: Blinkie Making! (Warning, slightly image heavy)
I decided to make a tutorial because several people PMed me asking me to make blinkies for them, so I wanted to show everyone how.  I've took screenies so you can see examples. I'll probably fix the size of the screenies later, for now, they're good enough.
Required:
-Animation Shop for animating (Sorry, but I dunno how Image Ready for Photoshop works all that much. However, if you know how to animate with it, and just have trouble DRAWING the blinkie, then no problem. From Step 7 on is Animation Shop required.) You can get Animation Shop from like, download.com, or at jasc.com at a 30 day trial. If you bought PSP7 from a store, you'd have gotten Animation Shop with it.
-Patience
Step 1) Start out in Animation Shop, Photoshop, or Paint Shop Pro. Create a new image that's 10 height by 100 length. The length could be increased, but that'd be a really long blinkie, so 100 is ideal.
Step 2) Turn on the ruler option, if you have it. It makes things very neat and orderly. PSP7 and up will have this. Photoshop probably will too. Animation Shop does not, that's why I like to work with PSP7 and Animation Shop. View --> Ruler for the Ruler.
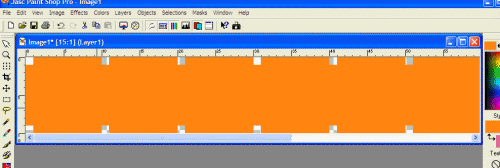
Step 3) Fill in the box with a colour. Then at every 10th pixel, starting at zero, erase one pixel at the very top and bottom of the blinkie. Like in the screenie. I recommend you zoom in a lot for this.

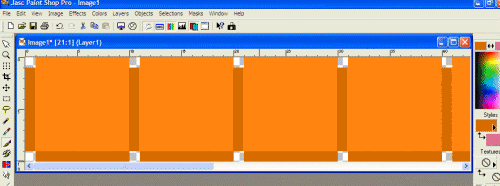
Step 4) You're definitely going to have to refer to the following screenie for this. Pick a shade a bit darker than the colour you've chosen for the blinkie, then, colour over in the following places on the screenie in the dark colour.

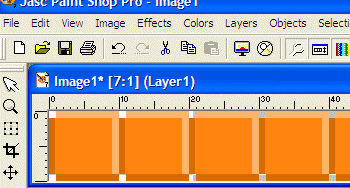
Step 5) Pick a slightly lighter colour than the colour you chose for the blinkie (not the darker shade, the other shade) and colour in the following places:

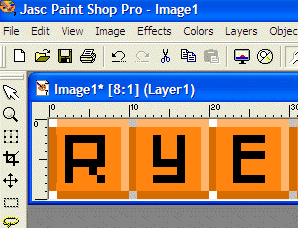
Step 6) Almost done drawing! Just gotta do the text. Now, I just draw the text using a one pixel brush tool. The letters take a bit of practice to make them look right. Keep in mind that they're pixels and upclose they make look odd, but look fine at normal size.

Now, you can stop here and save it as a .gif with transparency, if you're fine with that, but if you wanna animate, copy your blinkie aaaand...
Step 7) Paste it into Animation Shop. We're going to make a very simple blinkie so, it'll required few frames. Go to Edit --> Paste --> After current frames, so you get 3 of the same frames. Now, pick the colour you want one of your letters to be (I picked white) and using Flood Fill (the paint bucket shaped tool) click the first letter. It'll be white now. If you have pixels that are unconnected, like my R for Rye has, then, click the uncoloured pixel.
Step 8) For the next frames, colour the next letter after, and so on until you have something like this:

Step 9) You're basically done, but you may notice the speed of the flashing letters is too fast. If you want to fix this: Edit --> Select All. Then Animation --> Frame Properties. You'll see a number there. The number means frames per second. If you want to speed it up, put a smaller number. If you want to slow it down, put a higher number. Play around until it's nice. I recommend 15-20.
You're done. Now just view animation and save it!  You should get something like this:

Some other blinkies I've done today are:


Try different things and effects with the blinkies. 
Hope you enjoyed this tutorial and learned something. Post some of the blinkies you've made, also~
Last edited by Rye; 05-31-2005 at 01:34 AM.
 Posting Permissions
- You may not post new threads
- You may not post replies
- You may not post attachments
- You may not edit your posts
-
Forum Rules
I've took screenies so you can see examples. I'll probably fix the size of the screenies later, for now, they're good enough.


You should get something like this:


 Reply With Quote